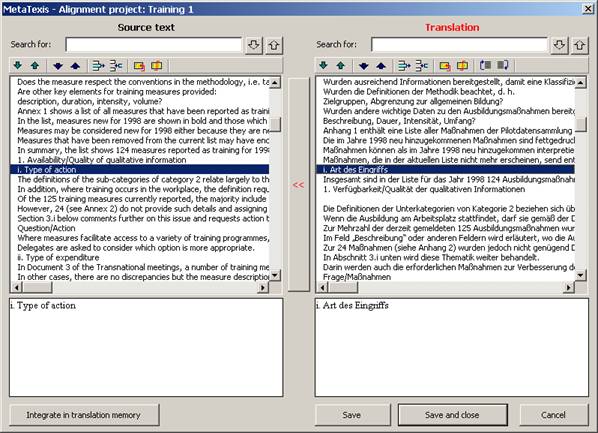
In dialog box mode, the two documents to be aligned are presented in one dialog box, and the results are saved to an alignment database. The documents are no longer recognizable as such. Rather, there is a collection of source segments retrieved from the documents with the source text and a collection of translated segments retrieved from the document with the translation.
When you activate an alignment project in dialog box mode, the following dialog box is displayed:
The source segments are displayed on the left side of the dialog box. The translation segments are displayed on the right side. Each line in the list boxes represents one segment. Therefore, many segments are only partially shown in the list boxes.
The complete text of the selected segment is displayed in the two text boxes located below (RTF text, if available).
The objective of an alignment project is to assign a segment from the translation to its source segment. The alignment task is finished when each line on the right side represents the translation of the corresponding line on the left side, e.g. line no. 2 in the right side list should be the translation of line no. 2 in the left side list. When no translation is available for a source segment, the translation segment should be empty. When there is a translation without a source segment the source segment should be empty.
Several functions are provided to achieve the alignment objective. They can be executed either by clicking on the toolbar right above the list boxes or via a shortcut:
·
Go down/up  /
/ :
:
Selects the line below/above the line currently selected.
If the absolute line number of the two lists is different, the translation box has a yellow background (e.g. if line 2 in the source list and line 4 in the translation list are selected). If the line numbers are the same, both the source text box and the translation box have a white background.
You can match the list numbering by double clicking on a line or by using the Go down both or Go up both commands.
·
Go down/up both  /
/ :
:
Selects the lines below/above the lines currently selected. At the same time, the list positions are aligned.
·
Delete empty line  :
:
Deletes the line if an empty line is selected. The lines below will shift upwards.
·
Add empty line  :
:
Adds an empty line above the selected line. The lines below will shift downwards
·
Combine two consecutive lines  :
:
Adds the line located below the line selected to the selected line.
·
Separate line  :
:
Separates the line at cursor position (here, cursor position refers to the cursor position in the text box located below the list).
·
[Translation only:] Move line up/down  /
/ :
:
Moves up/down the line. In the source list, the segment which the translation has been moved to (and is assigned to) is highlighted. (The order of the source segments cannot be changed).
· Assign line (the << button located in the middle between the two lists):
The selected translation segment is moved to the place of the selected source segment. The following segments in the source or in the translation list are shifted (if necessary) to keep the segments below in the same order.
It is advisable to start the alignment at the top and go down step by step until reaching the end. In principle, you could also start at the end, but this approach is not recommended as you will need (much) more time.
 Integrating the Alignment File into a Translation Memory