
The elements and functions of the database center for TMs are explained in the following paragraphs:
· The name of the active database is shown in a gray text box right below the title bar of the dialog box. (If, for some reason, no database is selected, this is indicated in red.)
Right next to it, near the upper right-hand corner, there are two buttons: Select and Create. These buttons allow you to change the TM being displayed. In fact, you can display any TM by selecting a database from the dialog box shown and clicking on the Select button. By clicking on the Create button, you can create and display new databases.
· The left side of the dialog box contains all you need for sorting, filtering, and navigating through the TM being displayed.
▪ Sorting:
You can sort the TUs in several ways. To change the sorting rule, select another item from the Sorting drop-down list.
Moreover, you can choose between ascending and descending order in the drop-down box located next to it.
▪ Main filter:
The main filter is a tool for database experts who are familiar with Microsoft Access (though the technique is easy to learn).
To activate the main filter, click the Main filter: not active button. The following dialog box will appear:
To filter the database, select a field in the first line. Select a function and enter the value whereby you want to filter the datasets. You can combine several filters in the five lines available. To apply the filter settings, click the Apply and close button.
When you have activated the main filter, the Main filter: not active button will change to Main filter: active.
To clear the main filter and display all datasets of the TM, click the Clear button.
▪ Mini filter:
The mini filter is very easy to use. You simply have to add a text in one or both text boxes below the Clear mini filter button.
When you enter a text in the left text box (while the right text box is empty) and press the tabulator key or the Return key on the keyboard, only those TUs which contain the text entered in the source segment are shown.
When you enter a text in the right text box (while the left text box is empty) and press the tabulator key or the Return key on the keyboard, only those TUs in the translation which contain the text entered are shown.
When you enter text both in the left and the right text box, the result depends on the setting Operator for mini filter. If the operator is set to "AND, then only those TUs will be displayed where the source text contains the text in the left box AND the translation contains the translation in the right box. If the operator is set to "OR, then only those TUs will be displayed where the source text contains the text in the left box OR the translation contains the translation in the right box.
To clear the mini filter, click the Clear mini filter button.
▪ List box with datasets:
The main element of the left side of the dialog box is the list box containing the TUs. Each line represents a TU. The left column lists the source segments; the right column lists the translations.
To navigate in the TM, click one item in the list box and go up or down in the list using the Up, Down, Page Up, Page Down, Home, and End keys. Alternatively, you can use the navigating buttons located on the left side below the list box.
The gray box on the right side of the navigation buttons, below the list box, tells you which dataset is currently selected.
· On the right side of the dialog box, the TU selected, including all its details, is displayed. The source language and the source text are shown on the left side; the translation language and the translation are shown on the right side.
The categories are shown below.
In the lower part, information about the TU selected is shown:
▪ If the segment info is available, you can click the button Info button to display the Segment info (see Segment Info). (The segment info information is actually saved in the database. So you have the same information as in the document the TU was a part of at saving time.)
▪ If a saving history is available, you can click the History button to display the dataset's saving history. The following dialog box will be displayed:
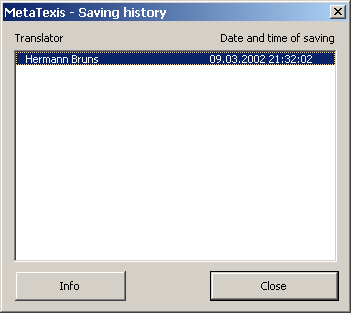
The Saving history dialog box displays the saving history of the current TU, that is, the history of new translations saved in the TM.
When you click the Info button, or if you double click an entry, the following dialog box with detailed information about the translator and the following dialog box is shown:
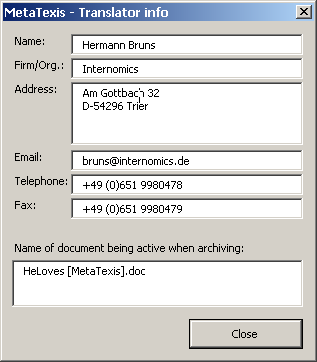
▪ First translator (who saved the TU first) and Last editor (who saved the last version of this TU) and the corresponding dates:
This is, in fact, a part of the saving history.
▪ Number of usages: number of times when the TU was retrieved from the TM to be presented to a translator
▪ Date of last usage: Date of last time when the TU was retrieved from the TM and presented to a translator.
· In the lower margin of the dialog box, there are several buttons:
▪ Import/Export: see the Importing and Exporting TMs and TDBs.
▪ Delete: When you click the Delete button, the selected TU will be deleted (after you have confirmed deleting).
▪ Take over: When you click the Take over button, the translation of the selected dataset is taken over into the document (but only if the cursor is placed in the translation box of an open TU).
▪ Close: To close the Database center dialog box, click the Close button.